

How To Color Anime People Tutorial Tumblr
I have been asked how do i make my gifs a couple of times, so i decided to practise a tutorial. Please keep in mind that English is not my native language so i apologize for any mistakes, i will endeavour my best. (Image HEAVY)
What yous will need :
- Some basic photoshop knowledge
- Any version of photoshop,i will use photoshop CC for this tutorial but i believe all versions share many similarities since i have besides tried CS6 and CS5
- Kmplayer or any other screen-capping program if you want to follow just the coloring tutorial, sick be using Kmplayer for the giffing tutorial
- Gradients( any gradients, you lot can notice many here, not necessary)
- A High quality video (i use 720p)
What i volition teach yous :
- How to make gifs
- How to color them( meaning learn how to utilise adjustments for giffing purposes)
- Many tips
How to get from this:
to this:
- The Screencaping function
1. Beginning of all open your video in KmPlayer, i will open the third episode of the second season of kuroshitsuji.
2. Pause the video when you reach the scene you want to gif and and so printing Ctlr + G, a new window should appear:
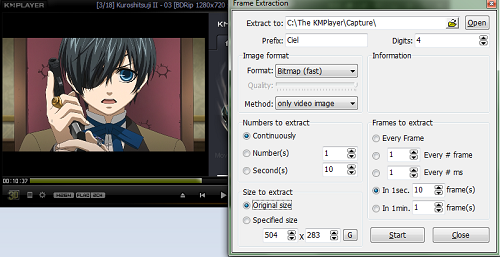
apply the aforementioned settings as mine except of
extract to: C:\the KMPlayer\Capture\ only change it to whatever binder you desire to salve your screencaps into
Prefix: Ciel Thats simply the proper noun of the screencaps, i chose Ciel since ill be giffing Ciel you cant change it into anything you like.
Size to extract: you lot can select specified size but thats simply good for 500px gifs considering smaller gifs expect horrible so its amend to resize on photoshop. Also if the scene yous are giffing has vibrant colors similar red or yellow or cyan its better to cull original size or they volition get kinda pixelated
3. Click start and and then resume the video so you tin can showtime screencaping Exist CAREFUL DONT CLICK THE X BUTTON AT THE SCREENCAPING SETTINGS JUST RESUME THE VIDEO WITHOUT EXITING.
4. When the scene y'all want to gif is over simply printing Ctrl+G and then click stop. That was it screencaps are taken!
- The Giffing part
ane. Open up Photoshop
ii. So go File –> Scripts —> Load files into stack… —> Browse… —> Go find the folder you saved your screencaps in and then select them and then press OK.
three. Wait for all the epitome-layers to load
iv. Its time to resize the gif. Go to Prototype —> Prototype Size…
im going to resize to:
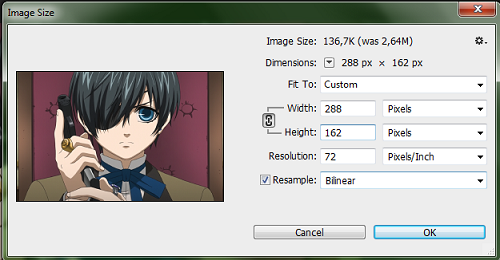
tumblr's width is 245px gifs for two gifs in a row, but i wanted to have more summit so i chose to resize to 162 height and then crop to 245 width and 160 height. Why did i resize into 162 top instead of 160 from the start? considering when you lot resize you become some ugly transparent lines(in some videos not ever) and because nosotros don't desire that i always leave 2px more to crop so we tin go rid of them. As well be careful, cull a resizing option, it changes how a gif looks a lot!! i ever choose billnear.
As well RESIZE Merely ONCE OR You lot Will LOSE QUALITY.
v. Now fourth dimension to resize the sail meaning to ingather as i mentioned earlier to the concluding sizes. Go Image —> Canvas Size…
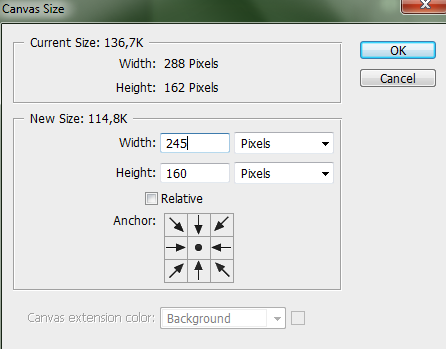
ok something like that ^.^ always choose pixels and unselect relative. Click OK and yous are done.
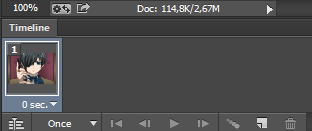
half-dozen. At present we demand to make the gif frames, in my version of photoshop you need to click on this

which is located on the timeline button.
and then we get this:
7. thats what yous must have, just i frame, some of you might have it already similar this so no need to exercise stride 6.
viii. Select the little menu on the correct and click Brand frames from Layers
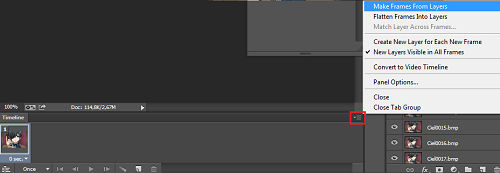
now you must have all the frames loaded.
9. Select the picayune carte on he correct again and select reverse frames because the gifs is in reverse so we got to brand it normal again.
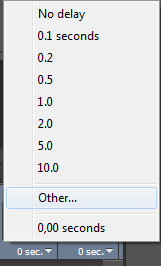
10. Select all the frames by the little card on the right and click to that little arrow next to 0 sec. thats how much time a frame plays, i always choose Other… —> 0,xi secs.
And yeahhhh we are done!! at present lets move to the coloring part~
- The Coloring office
Earlier i start i desire to say some things, there is no wrong or correct style when it comes to coloring gifs, sick be showing you my manner of doing it.
1. Make sure you have your adjustments bar, if you deceit discover them go
Window —> Adjustments.
ii. Click the first layer (the one with the smaller number)
iii. I always start with Brightness/Contrast i dearest using dissimilarity because it will brand your gif look shiny, its like "cleaning your gif from grit" considering it makes blackness darker and white brighter.
Brightness = 12
Dissimilarity = 39
4. Now im going to use Selective color, which is really of import and it can change the colors on your gif a lot.
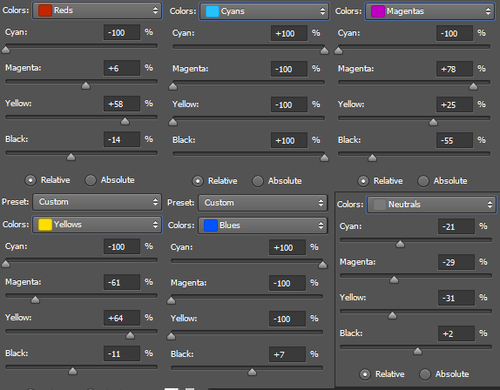
those are the settings that i used but y'all can modify them to your liking. Commonly i modify them to each gif i make considering every gif has dissimilar colors soo sometimes i want blue to be more than vibrant or dark-green to exist more vibrant.
5. Exposure
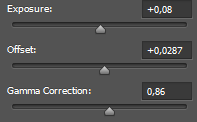
offset helps hiding details, it can make your gifs less pixelated, just dont overdo it because they tin become too greyish so nosotros use gamma correction to make information technology more blackness again.
6. Another layer of Brightness/Contrast
brightness = -2
Dissimilarity = 100
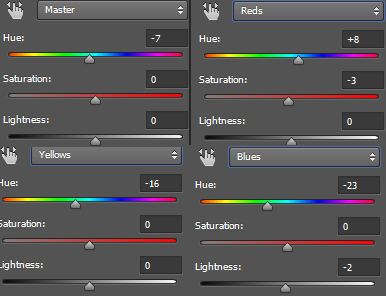
7. Hue/Saturation another thing that will make your gif's colors expect fabulous
8. Colour Balance
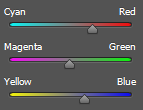
these settings will brand your gif look warm even though you accept vibrant blue
ix. Slope Map
ill use this blue/pink slope map
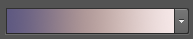
it will make the gif expect smoother and it will reduce the colors a fleck pregnant less grain. (i will put a download link for it in the end)
set up the mode from normal to screen and opacity 27%
10. Gradient map

from normal to multiply opacity 45% reduces colors again
11. Gradient map
another slope map, they make gifs expect gorgeous while reducing the colors

fix mode to brilliant light and opacity 17% (download link at the end)
12. Selective color (i will provide the psd so see the settings there)
13. Color residue (settings in the psd)
14. Selective color (i will provide the psd so come across the settings at that place)
15. Selective color (i volition provide the psd so see the settings there)
16. And the last layer is vibrance,
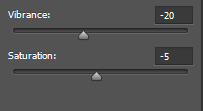
ok vibrance is really important, you have REDUCE It when y'all are making gifs or your gifs will go really grainy. SO NEVER Increase.
That's information technology! i gave yous guys some settings and i explained what each one does with a few words. Yous will find the final psd with the gradients i used HERE
- Settings Function
Now i volition give you my Sharpen and Surface Blur settings
Sharpen:
Filter —> Acuminate —> Smart Sharpen
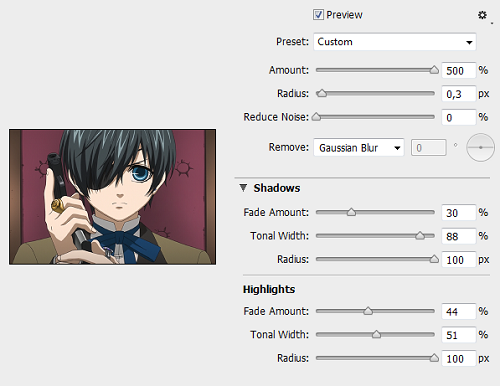
Surface Blur: (seriously use it its my favourite thing it reduces colors and information technology makes them shiny and sharp 100% would recommend)
Filter —> Blur —> Surface Blur
Radius = 36
threshold = 15
Here is a tutorial that tells you how to acuminate all layers at once(its the aforementioned affair for surface bluring) if you dont have the timeline button you will have to practice it layer by layer.
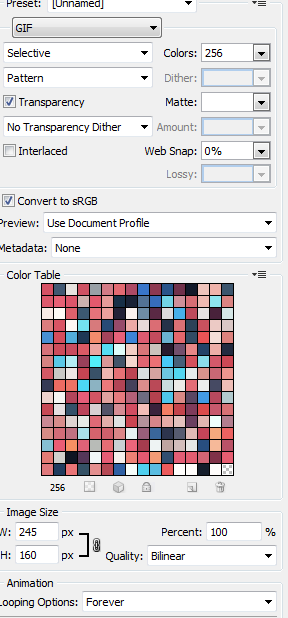
file –> save for web
And thats it!!! Happy giffing ~ if you accept any questions feel free to bulletin me.
Tumblr's Sizes have inverse!! For more info look here
Source: https://hissoka.tumblr.com/post/88869707515/how-to-gif-and-color-anime
Posted by: renfroeshunt1950.blogspot.com
0 Response to "How To Color Anime People Tutorial Tumblr"
Post a Comment